In this guide we explain the installation of SonarQube on Rocky Linux 8 / CentOS 8 / CentOS Stream 8. SonarQube® is an automatic code review tool to detect bugs, vulnerabilities, and code smells in your code. It can integrate with your existing workflow such as Jenkins to enable continuous code inspection across your project branches and pull requests.
In this brief guide, we shall be installing this fantastic Open Source tool so that you can have the opportunity to review your team’s code before they are deployed in production. It will help in streamlining your applications as well as improving in their security by detecting outdated software used and making apt recommendations on the fly.
Setup Pre-requisites
- SonarQube is built on Java, so we shall ensure that Java 11 is installed
- Another user apart from root to run elasticsearch hence SonarQube
- PostgreSQL
To have this tool installed in your Rocky Linux 8, follow the steps shared below:
Step 1: Update and install required tools
In this step, ensure that your server is well updated as well as install all tools you will require during the installation process. We shall also tweak system settings such as SELinux, max_map_count and fs.file-max. Run the commands below to update your server.
sudo yum update -y
sudo yum install vim wget curl -y
Configure SELinux as Permissive
This can be done by running the commands below:
sudo setenforce 0
sudo sed -i 's/^SELINUX=enforcing$/SELINUX=permissive/' /etc/selinux/config
Tweak max_map_count and fs.file-max
From Linux Kernel Documentation, this file contains the maximum number of memory map areas a process may have. Memory map areas are used as a side-effect of calling malloc, directly by mmap, mprotect, and madvise, and also when loading shared libraries.
To tweak the settings to befit SonarQube requirements, open “/etc/sysctl.conf” file and add the settings as shown below:
sudo tee -a /etc/sysctl.conf<<EOF
vm.max_map_count=262144
fs.file-max=65536
EOF
Then reload sysctl configuration as follows:
sudo sysctl --system
Create a user for sonar
It is recommended that a separate user is created to run SonarQube. Let us create one as follows:
sudo useradd -M -d /opt/sonarqube/ -r -s /bin/bash sonarStep 2: Install Java 17 on Rocky Linux 8
As it had been mentioned in the introductory section, SonarQube is written in Java and it needs Java installed (11 particularly in this setup).
sudo yum -y install java-17-openjdk-develConfirm successful installation of Java by checking the version.
$ java -version
openjdk version "17.0.7" 2023-04-18 LTS
OpenJDK Runtime Environment (Red_Hat-17.0.7.0.7-1.el8_7) (build 17.0.7+7-LTS)
OpenJDK 64-Bit Server VM (Red_Hat-17.0.7.0.7-1.el8_7) (build 17.0.7+7-LTS, mixed mode, sharing)
Step 3: Install and configure PostgreSQL
In this example guide, we are going to install PostgreSQL 13 server on the same sever SonarQube will reside. You can host it in a different server depending on your needs.
After the installation is done and we can connect to our Postgres Database successfully, we can go on to create a user and database for SonarQube.
Create SonarQube user and database
Here, we are going to create a user for SonarQube. Proceed as shown below before exiting your database.
sudo su - postgres
psql
create user sonar;
create database sonar_db owner sonar;
grant all privileges on database sonar_db to sonar;
Set a password for the sonar user created
ALTER USER sonar WITH ENCRYPTED password 'StrongPassword';
\q
exit
Step 4: Fetch and install SonarQube
Now we are at the point we have been waiting to arrive at for a long time. We shall download Long Term Release of SonarQube then install in our Rocky Linux Server. Proceed as follows to get our SonarQube installed.
Fetch SonarQube LTS Version
You can visit SonarQube Downloads Page to view their various offerings. We shall be downloading the Developer edition:
cd ~/
wget https://binaries.sonarsource.com/Distribution/sonarqube/sonarqube-9.9.1.69595.zip
Then unzip the file
sudo yum -y install unzip
unzip sonarqube-*.zip
After that, rename the folder to sonarqube
sudo mv sonarqube-*/  /opt/sonarqube
 rm sonarqube-*.zip
Step 5: Configure SonarQube on Rocky Linux 8
Once the files have been extracted to /opt/ directory, it is time to configure the application.
Open “/opt/sonarqube/conf/sonar.properties” file and add database details as shown below. In addition to that, find the lines shared and uncomment them.
$ sudo vim /opt/sonarqube/conf/sonar.properties
##Database details
sonar.jdbc.username=sonar
sonar.jdbc.password=StrongPassword
sonar.jdbc.url=jdbc:postgresql://localhost/sonar_db

##How you will access SonarQube Web UI
sonar.web.host=0.0.0.0
sonar.web.port=9000

##Java options
sonar.web.javaOpts=-Xmx512m -Xms128m -XX:+HeapDumpOnOutOfMemoryError
sonar.search.javaOpts=-Xmx512m -Xms512m -XX:MaxDirectMemorySize=256m -XX:+HeapDumpOnOutOfMemoryError

##Also uncomment the following Elasticsearch storage paths
sonar.path.data=data
sonar.path.temp=temp
Give SonarQube files ownership to the sonar user we created in Step 1.
sudo chown -R sonar:sonar /opt/sonarqubeIn case Java cannot be found in the default location, you will have to specify the binary files for SonarQube to find. You can specify where java is located in the “/opt/sonarqube/conf/wrapper.conf” file. Look for “wrapper.java.command” line and place your Java location beside it thus.
$ sudo vim /opt/sonarqube/conf/wrapper.conf
wrapper.java.command=/usr/lib/jvm/jre-openjdk/bin/java
Add SonarQube SystemD service file
Finally we are going to ensure that we shall be able to manage our SonarQube application via Systemd so that we can start and stop it like other services in your server
$ sudo vim /etc/systemd/system/sonarqube.service
[Unit]
Description=SonarQube service
After=syslog.target network.target

[Service]
Type=forking
ExecStart=/opt/sonarqube/bin/linux-x86-64/sonar.sh start
ExecStop=/opt/sonarqube/bin/linux-x86-64/sonar.sh stop
LimitNOFILE=65536
LimitNPROC=4096
User=sonar
Group=sonar
Restart=on-failure

[Install]
WantedBy=multi-user.target
After editing systemd files, we have to reload them so that they can be read and loaded.
sudo systemctl daemon-reloadThen start and enable the service
sudo systemctl start sonarqube.service
sudo systemctl enable sonarqube.service
Check its status if it successfully started and is running.
$  systemctl status sonarqube.service
● sonarqube.service - SonarQube service
   Loaded: loaded (/etc/systemd/system/sonarqube.service; enabled; vendor preset: disabled)
   Active: active (running) since Tue 2021-07-27 18:49:18 EAT; 6s ago
  Process: 43024 ExecStart=/opt/sonarqube/bin/linux-x86-64/sonar.sh start (code=exited, status=0/SUCCESS)
 Main PID: 43073 (wrapper)
    Tasks: 36 (limit: 4522)
   Memory: 548.3M
   CGroup: /system.slice/sonarqube.service
           ├─43073 /opt/sonarqube/bin/linux-x86-64/./wrapper /opt/sonarqube/bin/linux-x86-64/../../conf/wrapper.conf wrapper.sy>           ├─43075 /usr/local/jdk-11.0.2/bin/java -Dsonar.wrapped=true -Djava.awt.headless=true -Xms8m -Xmx32m -Djava.library.p>           └─43097 /usr/local/jdk-11.0.2/bin/java -XX:+UseConcMarkSweepGC -XX:CMSInitiatingOccupancyFraction=75 -XX:+UseCMSInit
Step 6: Alter Firewall rules to allow SonarQube Access
At this juncture, sonarqube service should be running. In case you cannot access the web interface, visit the log files located in “/opt/sonarqube/logs” where you will find:
- elasticsearch logs (es.log)
- Sonar logs (sonar.log)
- web logs (web.log)
- Access logs (access.log)
- And others
As you can remember, we enabled SonarQube web to listen on port 9000. For everything to work, we should allow this port on the firewall. Proceed to do this by running the command shared below.
sudo firewall-cmd --permanent --add-port=9000/tcp && sudo firewall-cmd --reloadStep 7: Access the Web User Interface
The time we have been waiting for has finally showed up. We are now ready to access SonarQube interface and begin assessing our code for security. To access the interface, open your favorite browser and point it to http://server-ip-or-fqdn:9000. You should see a page similar to the one below.
Step 8: Access SonarQube Web interface
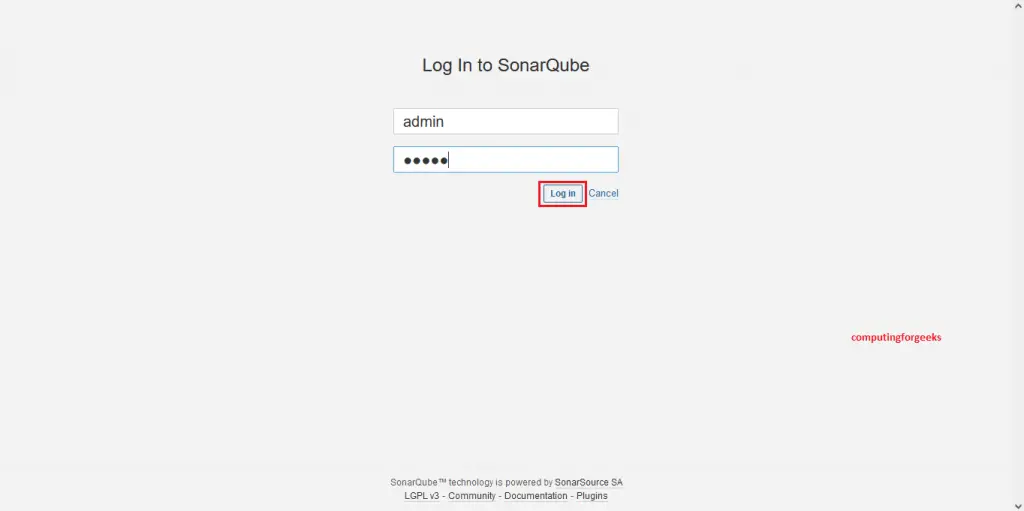
To log in, simply click on the “Log In” button and you should be ushered in a page similar to the one shared below. Use username as “admin” and password as “admin“.

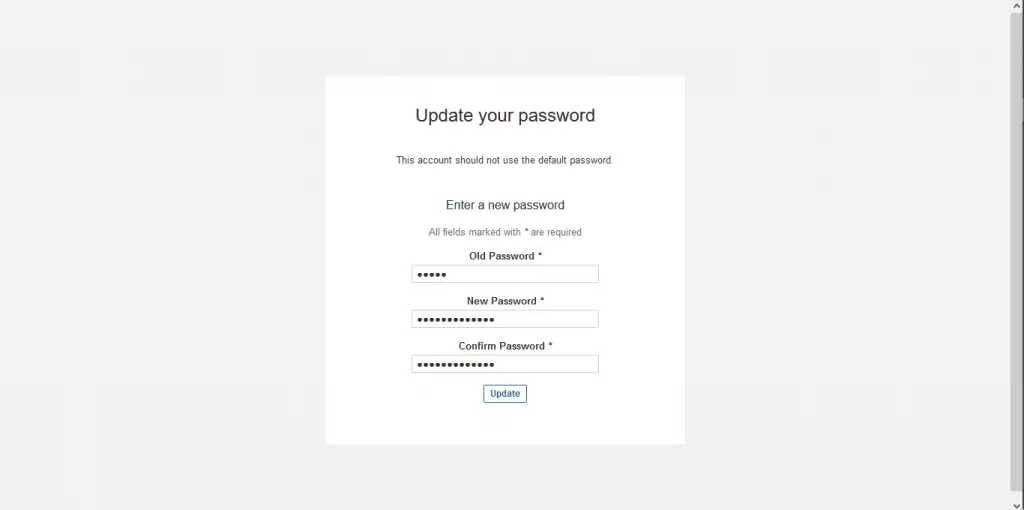
After that, you will be asked to update the password to a new one. Enter new Administrator Password and Proceed to login.

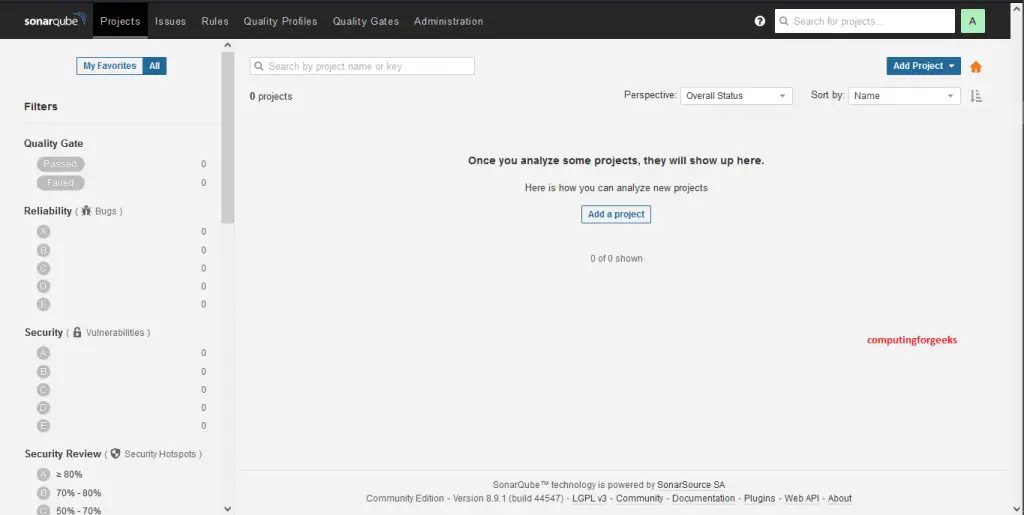
You should be ushered into the main area as illustrated below:

Final Musings
Now we have our automatic code review tool that you can use to scan various applications before they are approved for production. It is simple, thorough and complements your organizational security needs. Try it out.We appreciate your visit and for the tremendous support you continue to extend. Other guides you might enjoy are listed below:
- How To Integrate SonarQube with Jenkins
- Install SonarQube Code Review Tool in CentOS 7
- How To Install Jenkins on Rocky Linux 8
- How To Use Multi-Branch Pipeline in Jenkins
